New NUI

Recently I saw a interesting tweet from Seth Sandler regarding a AS3 speech recognition lib. The demo was very impressive. So I wondered why not for python ?. So I started looking around for some premade librarys in Python. I found three good ones

The first two where windows only solution so they where rejected immediately. The Sphinx library from CMU is very vast library. After some reading I found out that the dwarf version of Sphinx called pocketsphinx is just a plugin for Gstreamer. It was very easy to integrate them and finally integrated them to PyMT. šŸ™‚ . I will be posting the example app as well as Speech Recognition engine for PyMT will be included in the 0.4 release. Can’t wait to see how users will use this new capabilities in their apps šŸ™‚

Other then this i’ve been working on completely rebuilding the animation framework for PyMT 0.4 and its complete now WITH the wiki documentation. Thanks Mathieu for all the advices you gave me in improving this. Heres a video of the app he made with the animation framework.

This one I did.

We are trying our best to release a Alpha version before Christmas, lets see how it goes. Lots and lots of changes and feature additions šŸ™‚

NUIPaint 0.1 Screenshots

Here are few of the screenshots of the application.

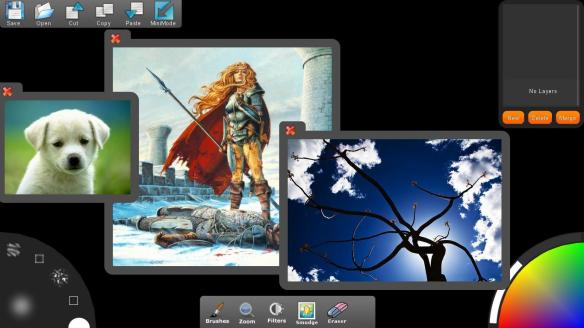
Initial Screen

Initial Screen

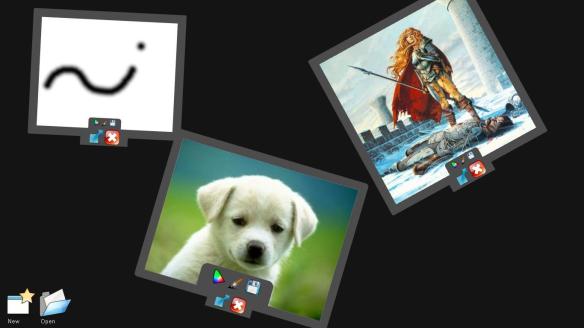
Collaboration Windows

Collaboration Windows

Fullscreen Mode

Fullscreen Mode

Windows in Fullscreen mode

Windows in Fullscreen mode

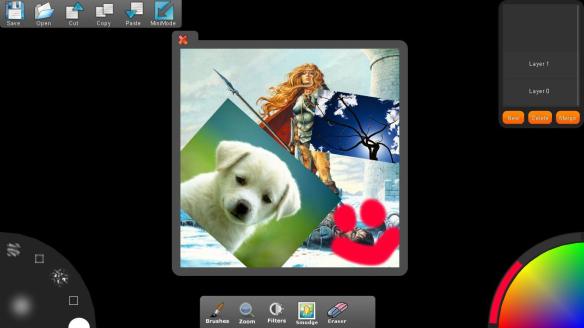
Layers within Canvas

Layers within Canvas

Filter Application

Filter Application

Comments, Suggestions and Criticisms welcome šŸ˜€

NUIPaint Pre Final Eval Report

Being selected as a GSOC student is one of the best thing that has happened to me in life. Not only being selected, but selected as a student learning under the two most admired people by me i.e. Mathieu Virbel and Thomas Hansen was the reason for my double joy. I thought that being a GSOC student will benefit me in getting a better job in the future. Man was I surprised as I progressed through the programme. So in this blogpost I will be summarizing how I learnt new things, altered my previous plans, made new plans to adjust to the schedule.

Phase 1 (Till Midterms)

This OO based programming was pretty new to me. Plus NUIPaint is my first actual application that I have coded. So I had very little idea how to start and where to start? So I set out building the UI as I provided the Mock-ups. But little did I know starting with UI is not a good way of software engineering. Mathieu suggested that I start building pymt widgets first and then integrate them one after another. So this was lesson number one for me ā€œModular Coding => Better Structure and better to handleā€.

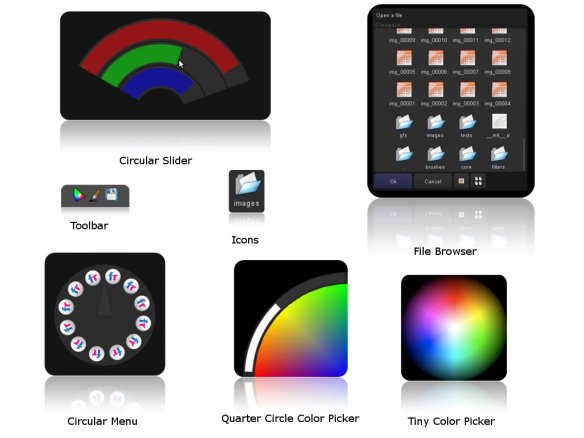
In my first phase I built several UI widgets, they are as follows

  • Circular Slider Widget
  • Circular Menu Widget
  • Quarter Circle Colour Picker Widget
  • FileBrowser Widget
  • Icon Widget
  • Tiny Colour Picker
  • Toolbars with Background
All Widgets

All Widgets

Descriptions of some of these and how I created them, I have already posted in my previous blogs.

With these widgets plus a simple implementation of layering system, I closed the Phase 1 of the project. So in the next phase I decided to integrate all these and focus on building the application aspect of the project.

Phase 2 (Post Midterms):

So I passed the midterms with the blessings from my mentorsJ, in this phase I wanted to focus more on the application aspects like building the layering system, GLSL filters, Natural Colour Mixing,Ā Ā  smudging, windowing, cut/copy/paste and others.

  • Layering System: Layering is one of the most important parts of any painting application. So I had to carefully plan how to build this, instead of directly jumping into coding, so I discussed this with Mathieu, he showed me how a pattern called Facade can be used to achieve this framework. I have finally implemented the following layering structure with Layer Manager being the Facade.Ā  Using layer list manager itā€™s possible to merge layers, create new layers, multiple layer merge, multiple layer delete etc.Ā  Layer list manager provides an interface for accessing the layer manager.
Layer Manager

Layer Manager

One more important feature I have implemented in layering is Layer ordering using gestures. Double tapping on a Layer takes it one level higher than its neighbour. Similarly holding one finger on the layer and double tapping on the same layer with another finger takes it one level lower.

  • Multiuser Windowing: There is all provision for multiuser collaborative windows.
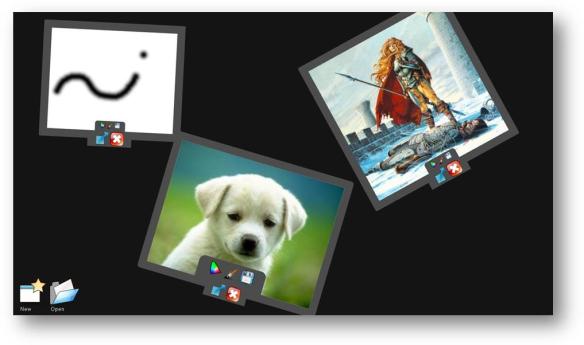
    Collaborative Windows

    Collaborative Windows

  • Observer Architecture: Two days back it struck me that instead of passing parameters and parameters of current canvas, current layer manager, current layer etc. Itā€™s much better if there is some entity which always keeps tracks of these things. So I implemented a new Observer Factory. This Observer is global throughout a program. It holds all latest information of various active objects in the system. So if some part of the application wants to know who the current canvas is, he just needs to query the Observer. This really simplified the entire programming routine.
  • Copy Cut Paste Architecture: The copy paste system I implemented is a very simple one its basically one class in the each instance of NUIPaint window. It consists of one Data store which holds the copied or cut texture. When pasting this data store is queried for the texture and a new layer is created in the target window. Similarly for cutting, the source layer is cleared after copying the texture of the source to the data store
  • GLSL Filters: This part of the project took a really long time to materialize, because I had no idea what GLSL means, how it works. My goal was to implement a separate Filter class, so that any texture can be altered using simple method calls like blur(texture, value), sharpen(texture,Ā  value). So it took 10days+ to understand the basics of glsl and implement 7 simple image processing filters. Following are the filters that I implemented Gaussian, Blur, Sharpness, Saturation, Brightness, Contrast, Black and White, Sepia.

first fourother filters

  • Natural Colour Mixing and Smudging: I’m still trying to figure out this one, I have a vague implementation now based on Gaussian Blur. Need a better algorithm for this one.

The sheer size of this project was overlooked by me during the initial proposal writing phase and there are several other aspects like focusing on development of reusable widgets for PyMT lead me to have shortage of time. But Iā€™m very keen on continuing this project even after the GSOC, and take it to the next iteration and make it a truly complete pymt app.

As for my satisfaction about this Project. Itā€™s been a really great experience for me, I have learned some really high technical stuff, I feel that now I have a better understanding about how the software engineering process works. And of course I really thank my Gurus(mentors) for teaching me and always being there to answer my questions and clear my doubt.

In my next blog post i’ll post a series of Screenshot of how NUIPaint looks as of now. Cheers!

Pixel Shader Magic

One thing which really fascinated me from really long is use of Pixel shaders to do interesting things in OpenGL. I’ve been trying to decipher the mystery of GLSL from a long time now, this interest in GPU based computation was sparked especially from Thomas’s Example apps in the PyMT trunk( Mandelbrot and Shadowing in Pictures example), although I never understood how it works back then (or might be because I never put much effort in understanding it).

GL Shading Language is a extension to OpenGL using which we can directly compute pixel and graphics on the GPU instead of the CPU. This provides us with tremendous performance benifits since pixel transformations run in parallel. The scope of Pixel shaders is amazing, some of us sometimes dont know how they achieve those stunning effects in latest computer games. Most of the effects like

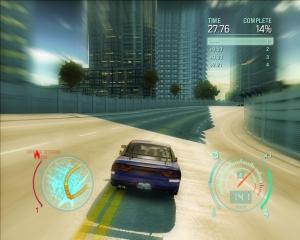
  • Motion blur
Motion Blur

Motion Blur

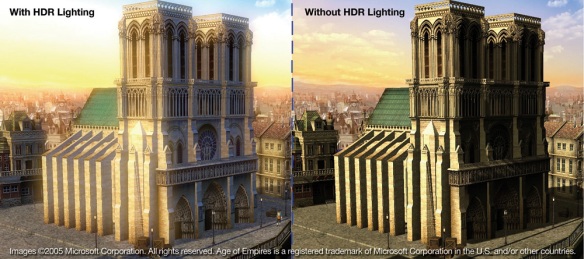
  • HDR Lighting

HDR Lighting

HDR Lighting

are all done utilizing the pixel shader capabilities of your graphics card. So I started out by searching someĀ  tutorials on the net and there are several good references that i found out.

GLSL is all about pixel manipulation, usually involving usage of neighboring pixel colors, distance etc etc. Its mathematics. But there are a lot of free GLSL code available online using which you can learn and implement your won shaders.

Once I learnt the basics of GLSL, I decided to put effort to further learn this technology and implement it in NUIPaint as filters. I found out that some common filters like Gaussian Blur, Sharpening, Embossing etc belong to a common group of shaders called as Convolutions Filters. These vary only by a single matrix called as Convolution Matrix. Its very interesting, for more details please check this link http://www.ozone3d.net/tutorials/image_filtering.php .

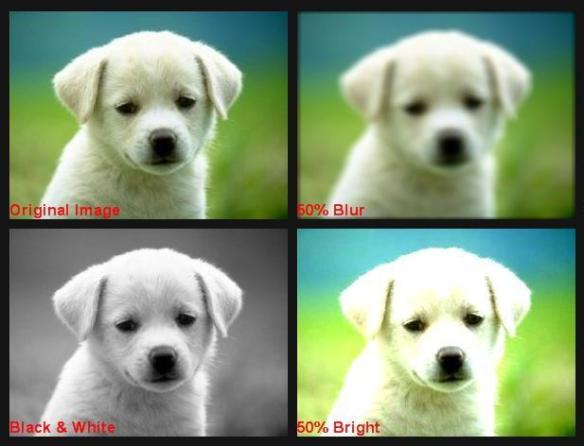
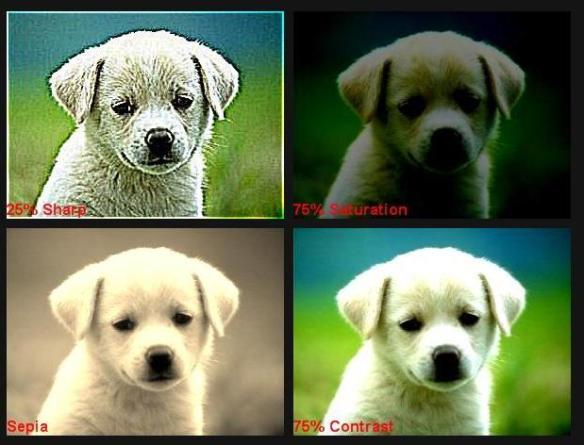
I implemented a separate class called Filters which will later be added into PyMT core. This class has several functions which take in texture as input, apply GLSL filters to it and return the transformed textures back. In total i implement 7 kinds of filters

  • Gaussian Blur
  • Sharpness
  • Saturation
  • Brightness
  • Contrast
  • Black and White
  • Sepia

Here is a set of screenshots of the Filtered images.

first four

other filters

It works much faster than regular CPU based filters like the ones in Python Imaging Library. If you want to use the glsl filters then here is the link to the source code, each filters vertex and fragment shaders are in separate functions, so you can easily use it in your programs. If you want to use the Filter class into your software then wait for the induction of the class into PyMT core soon šŸ™‚

Layering System

When discussing with Mathieu Virbel about the possibilities of implementing layering system in NUIPaint, he introduced me to this world of Design patterns. He gave this Wikipedia link and asked me to identify the pattern which is similar to the layer system I thought about. Even though I had a idea about implementing layering system, I failed to identify the right pattern. He then directed me to this pattern called Facade.

Facade Design Pattern (Source: Wikipedia)

Voila its was very similar to the structure I had in my mind. Then I realized how important it is to learn this important concept of Design Patterns eventhough I had heard the name in college šŸ˜› I had never given much interest to it. Now I realise its potential.

So i planned to implement three main classes.

  1. Canvas Class: This is the main class which gets created by the app. Its hold all classes as well. And provides interfaces to access the layers, brush controls, Saving the manipulated images
  2. Layer Manager Class ( FACADE ): This class maintains the creation and deletion of the layers. It also maintains a list of layers currently available, number of layers in list.
  3. Layer: Basic Unit of Layer, which draws itself and handles touch input.

This method of using layer manager as facade works pretty well. Next problem was to create a UI for accessing the Layer Manager features like creation of layers, deletion of layers and even handling layer sorting. So I implemented a new class called LayerList Manager. This class provides UI to create new layers, delete multiple layers in a form of kinetic scrolling list.

Below is aĀ  UML class diagram of the Layering system that I did

Class Diagram

Class Diagram

I really thank my bro Prashanth Patali and Mathieu for all the guidance they gave me in correcting this UML Diagrams, I’m now confident enough to draw the UML’s šŸ™‚